In part 3 we discussed how the MCS-1-RF wireless window mounted light sensor can be linked to our radio equipped blind and shade motors using RF (Radio Frequency). In part 4, we will learn how to configure the light sensing operations.
Please note that this system is very flexible in that the motor operation can be reversed. This means that if you are attempting to block bright sunlight, you can close the blinds when the light gets bright, and open them if it becomes cloudy. If you are using it to close the blinds at dusk and open them at dawn, just reverse the motor operation.
You can also use this sensor with a timer to facilitate light sensitive operation for blind & shade control AND timed operation.
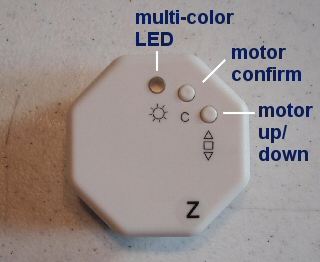
At this point the battery should be inserted into the battery compartment, with the light sensor unit powered up. If you press the Up/Down/Stop test button, the LED should flash.
 During normal operation, the Up/Down/Stop button acts as a manual over-ride control, allowing you to directly operate the blind as need be. You can think of it as a wall mounted remote control.
The sequence is Roller UP (red LED), Roller STOP (red + green LED), Roller DOWN (green LED), Roller STOP (red + green LED).
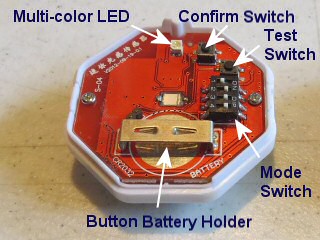
The picture at left is a detailed view of the internal circuit board (cover removed) and all the controls and switches used at various different times during the programming process.
Note that the light sensor itself is on the backside of the unit, inside the transparent suction cup. When you mount the unit on a glass surface or window, the controls are facing you, but the light sensor monitors light conditions on the opposite side.
When calibrating the light thresholds, remember to point the back of the sensor with the suction cup towards your light source. Typically, the suction cup on the back will be stuck onto a window pane.
 The 4 switches on the DIP switch are numbered 1, 2, 3, 4
Switch 1 is used for indicating if the unit is in setting mode or normal operation. The setting mode is 0 (right position, as per pictures below), the normal operating mode is engaged when it is in position 1 (the left position, as per pictures below). The other switches are used in combination to activate specific modes, according to the table below.
The first step is to move switch 1 to the setting position, then move the others accordingly. The sensor will send out signals within 10 seconds when the switch is placed at the 0 position, to indicate the end of the setting interval, so you should try to set the other switches within that time frame. If you don't finish the settings within that time, please move it back to normal, then back into setting mode to start over.
When finished adjusting the configuration of switches 2, 3, and 4, move switch 1 back to position 1 to engage normal operation. The switch settings below show the switch position patterns in the various operating modes.
Setting the Operating Mode
| DIP Switch Position | Mode | Observed State |
|---|---|---|
 mode A  mode B  mode C |
Weak light automatic control | The blind is activated only when it gets dark (less than 15,000 LUX). This is useful if you want to manually open the blinds with a hand held remote in the morning (or open the blind with a timer). Here are the steps:
|
 mode A  mode B  mode C |
Strong light automatic control | The blind is activated only when it gets light (more than 20,000 LUX). This is useful if you want to manually close the blinds with a hand held remote in the evening (or close the blind with a timer). Here are the steps:
|
 Mode D |
Strong light & weak light automatic control | The blind is activated in one direction when it gets dark, and activated in the other when it gets light. This is useful if you want your blinds to activate at dawn and dusk automatically.
The shade travel can be reversed by changing the pre-programmed motor direction (see section 5 of motor programming instructions here) |
 |
Light sensor unit disabled | The light sensor does not issue any motor commands. |
PART 1: Sunlight sensor for blinds - Removing the Cover
PART 2: Sunlight sensor for blinds - Controls and Layout
PART 3: Sunlight sensor for blinds - Linking to a Radio Motor
PART 4: Sunlight sensor for blinds - Adjusting Light Sensing Modes
We sincerely hope you enjoy using these advanced motors; if you have any questions, please feel free to contact us at any time!

 Shopping Cart Home - Start Here
 Remote Controls for Radio Equipped Motors
 DIY Starter Kits for Window Shades
 DIY Starter Kits for Window Openers
 ZWAVE Blind & Shade Controllers
 How To Choose the Right Blind & Shade Motor
 Select tubular Motor (Comparison table)
 Choose RollerTrol Battery & Solar Motors
 DIY Roller Blind Motors - FAQ
 How To Insert Blind Motors & Attach Brackets
 Calculate your Blind or Shade fabric Weight
 Select Tube Size for Blind Motor
 How to Insert Blind Motors Into Tube
 How to Insert Blind Motors Into Tube with Adapters
 Attach Mounting Brackets - Standard + Mini Series
 Attach Mounting Brackets - MAXI Blind Series
 How To Set Up Radio Equipped Blind & Shade Motors
 Series P Radio Remote Control Motors
 Series G Radio Remote Control Motors
 Series R Radio Remote Control Motors
 BroadLink RF/IR Hub System for Motors
 How To Set Up Window/Skylight Openers
 Introduction: Window & Skylight (K Series)
 BroadLink RF/IR Hub System for Motors
 Z-Wave Interfacing for Shade & Opener Motors
 Wired Wall Switch Control of Window Openers
 How To Use Alexa With Our Motors & Window Openers
 How To Use BroadLink Phone App Hub With Our Motors
 How To Set Up ShadeSlider Skylight or Bottom-Up Blind
 How To Retrofit RV, Boat and Motorhome Blinds
 How To Set Up Non-Radio Motors
 Operation & Travel Limits of Non-Radio Motors
 Make a Simple DC Motor Reversing Switch
 How To Set Up ZWAVE Control
 ZWAVE Controller for G Series Radio motors
 ZWAVE Door/Window Opening Detection
 ZWAVE Motion Detector with Temperature Sensing
 Motorized Window Blinds & Shades
 Motorized Dual Window Shade
 Make Motorized Blackout Blinds
 Phone-Tablet-PC Control for Motorized Blinds
 Mini Motor for Existing Shade Retrofit
 Roman Shade Retrofit
 Make a Motorized Window Opener
 Blind & Shade Motors for RV & Boats
 Make Your Own Projector Screen
 Curtain Closer: Ultimate Home Theater
 Wireless Battery Operated Drapery Motor Kit
 Make a Motorized Bottom-Up Shade
 Make a Motorized Skylight Opener
 BroadLink RF/IR Hub System for Motors
 Why Buy From US?
 Background & Mission Statement
 Customer DIY Testimonials
 Site Map - Search All Pages
 Why Buy From US?
 RollerTrol Users Forum
 Contact Page