Phone App for Blind Motors: Methods of Adding RF Motor Controls

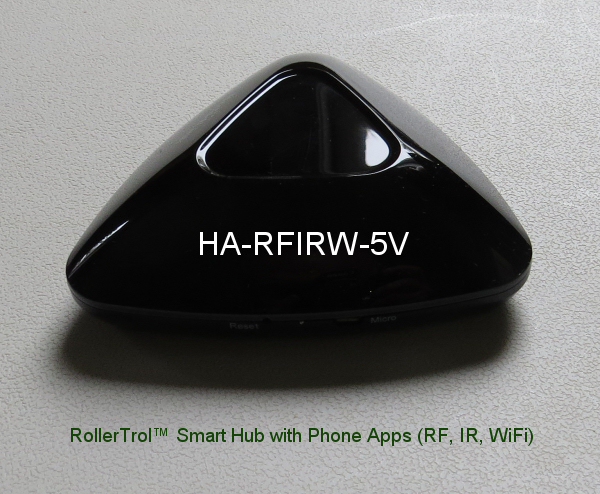
This article is about adding RF remote controls to the phone app that controls our blind motors, skylight/window openers, smart film, drapery motors, and many other devices, such as fans & LED lighting, using the BroadLink® smart WiFi hub.
One of the most important features is its ability to "learn" RF radio commands, which means it can directly control our radio motors, whether they are our new G series radio motors or the older R series motors. It can also learn x10 radio commands, in case you have a few of those old modules lying around. It is also an excellent IR code learner too, for controlling all your TV, sound and other media systems.
If you didn't see the previous article about downloading and installing the phone apps, please take a moment to review that important step.
Please Note: It is important to follow these instructions sequentially to avoid any confusion.
This controller has quickly become our hub of choice for a number of reasons, not the least being the ease-of-use factor, and if you follow these instructions carefully, you will find that it is quite "user friendly".
Buy These Products In Our Online Store
If you are interested, you can purchase these products in our DIY online automation store.
Methods of Creating Remote Control Buttons on Your Phone
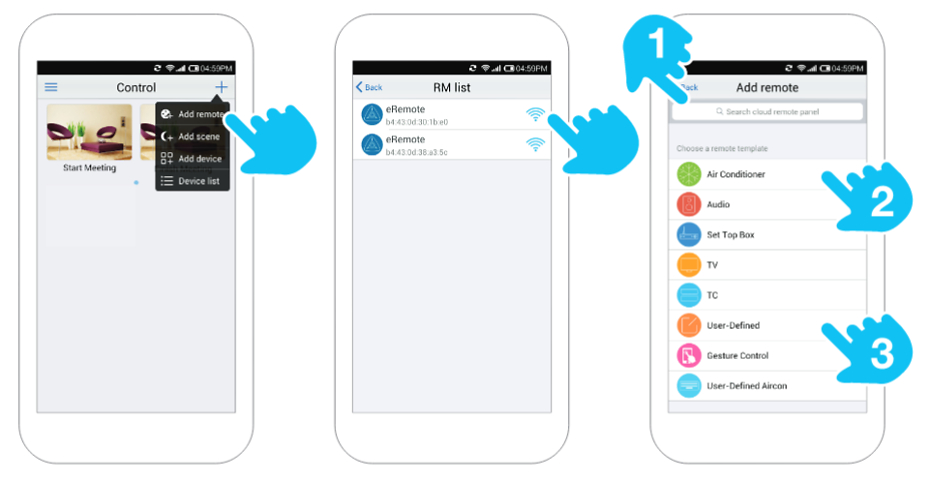
There are 3 different ways to create control buttons on your phone with the BroadLink® app, and the process starts with the Add Remote menu link that is accessed by pressing the large 'plus' sign (+) in the upper right hand corner of the Control home screen (pictured at left below).
When you press the + sign it will display the list of RM hubs on your WiFi system (you can have more than one), so the next step is to select the hub where you want to create the remote control, as seen in the center of the picture below.
Please Note: If you only have one RM hub, the program will skip this step and go directly to the 3rd screen you see below (you will not see the middle screen in the picture below).
The next screen is where you have a choice of 3 methods (as shown on the 3rd screen on the right in the picture below):
Please Note: Before you start, take a look at the next section "Devising a Strategy", it might save you some time.
- Press the magifying glass to search for a pre-existing remote type in the online cloud database. This will come with pre-programmed buttons that should work immediately, if it is an IR (Infra-Red) type of remote (the most common type). You can also "re-learn" commands from your device remote if it needs an adjustment.
- Choose a pre-existing template from the local program database on your phone, then use your hub to "learn" the commands from your device remote.
- Create your own remote control "skin" from scratch with the User Defined method, then use your hub to "learn" the commands from your device remote.

Devising a Strategy For Your Control System
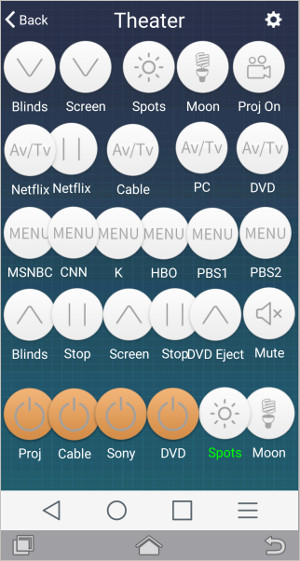
 In this article series we will be discussing the home theater system we used as an example for configuring the hub control system. This scenario involves many of the components you might want to control in a media room or home theater:
- blackout blind control
- lighting control
- projector control
- audio/video switching
We have created a "skin" (method 3, above) that has all the buttons involved in the deployment of our systems, so if you use the search function mentioned in method (1) above, type Rollertrol and it should come up.
Please feel free to download and install this, as it might save some time. You can re-label, re-program and change the position of the buttons, and if you decide not to use it, you can simply delete it.
We also created some secondary screens (using method (1) that are very specific to some of the various components we have, such as a Motorola set-top box for cable, a Western Digital streaming box for Netflix, and an LG Bluray disk player. You can replace these with pre-configured skins that match your own components.
Another tip: you can extend operation to your laptop by using a program that puts your phone screen onto your local laptop screen, using mouse clicks as button presses. We used the excellent Seven Square program to display our LG G2 and G3 Android phone screens on our local Ubuntu 16.04 laptops via USB. There are similar programs for Windows, Mac, and IOS.
The next step will be to demonstrate how we created this control screen for our home theater and added the remote control commands, as covered in the next article.
Buy These Products In Our Online Store
If you are interested, you can purchase these products in our DIY online automation store.
Articles in this series:
Part 1-Smart hub for blind motors: Introduction
Part 2-Smart hub WiFi router connection: Activate Hub
Part 3-Smart hub program installation: Download Software
Part 4-Smart hub methods: Creating Control Screens (you are here)
Part 5-Smart hub example: Home Theater Control Screen
Also, see the follow-on series about our other devices:

 Shopping Cart Home - Start Here
 Remote Controls for Radio Equipped Motors
 DIY Starter Kits for Window Shades
 DIY Starter Kits for Window Openers
 ZWAVE Blind & Shade Controllers
 How To Choose the Right Blind & Shade Motor
 Select tubular Motor (Comparison table)
 Choose RollerTrol Battery & Solar Motors
 DIY Roller Blind Motors - FAQ
 How To Insert Blind Motors & Attach Brackets
 Calculate your Blind or Shade fabric Weight
 Select Tube Size for Blind Motor
 How to Insert Blind Motors Into Tube
 How to Insert Blind Motors Into Tube with Adapters
 Attach Mounting Brackets - Standard + Mini Series
 Attach Mounting Brackets - MAXI Blind Series
 How To Set Up Radio Equipped Blind & Shade Motors
 Series P Radio Remote Control Motors
 Series G Radio Remote Control Motors
 Series R Radio Remote Control Motors
 BroadLink RF/IR Hub System for Motors
 How To Set Up Window/Skylight Openers
 Introduction: Window & Skylight (K Series)
 BroadLink RF/IR Hub System for Motors
 Z-Wave Interfacing for Shade & Opener Motors
 Wired Wall Switch Control of Window Openers
 How To Use Alexa With Our Motors & Window Openers
 How To Use BroadLink Phone App Hub With Our Motors
 How To Set Up ShadeSlider Skylight or Bottom-Up Blind
 How To Retrofit RV, Boat and Motorhome Blinds
 How To Set Up Non-Radio Motors
 Operation & Travel Limits of Non-Radio Motors
 Make a Simple DC Motor Reversing Switch
 How To Set Up ZWAVE Control
 ZWAVE Controller for G Series Radio motors
 ZWAVE Door/Window Opening Detection
 ZWAVE Motion Detector with Temperature Sensing
 Motorized Window Blinds & Shades
 Motorized Dual Window Shade
 Make Motorized Blackout Blinds
 Phone-Tablet-PC Control for Motorized Blinds
 Mini Motor for Existing Shade Retrofit
 Roman Shade Retrofit
 Make a Motorized Window Opener
 Blind & Shade Motors for RV & Boats
 Make Your Own Projector Screen
 Curtain Closer: Ultimate Home Theater
 Wireless Battery Operated Drapery Motor Kit
 Make a Motorized Bottom-Up Shade
 Make a Motorized Skylight Opener
 BroadLink RF/IR Hub System for Motors
 Why Buy From US?
 Background & Mission Statement
 Customer DIY Testimonials
 Site Map - Search All Pages
 Why Buy From US?
 RollerTrol Users Forum
 Contact Page