Alexa™ + BroadLink™: Configuring the BroadLink™ Hub & Alexa™ Library Components
Adrian Biffen, Senior Partner
Please Note: This article series about Alexa™ assumes you have already set up your BroadLink hub with the phone app (see home theater phone app article series). We are also assuming you have started Node-RED on the Pi, ready to create your first flow with your BroadLink™ hub.
In the previous Part 2 of this series, we discussed how Alexa™ can be used with the Raspberry Pi® and the Node-RED visual design system to control blinds, shades, window openers and many other devices.
In this article (Part 3), we'll actually deploy a BroadLink RM Pro node and learn how to configure it to allow control of various devices that you had previously configured with the phone app.
Starting Your Node-RED Flow With the BroadLink™ RM Pro
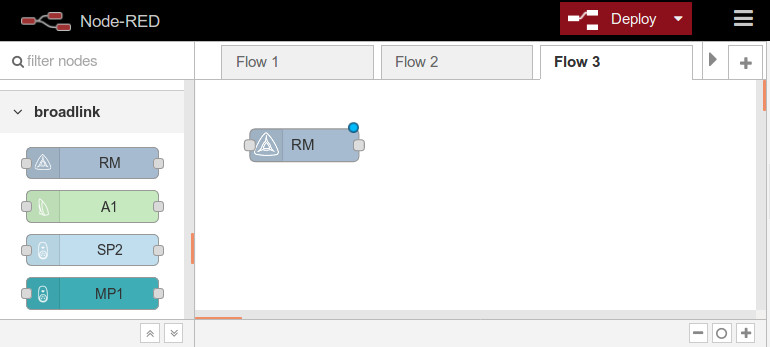
The first step is to locate the BroadLink™ hub by scrolling the palette panel on the left side of the screen until you see the BroadLink Section. There are nodes for each of the BroadLink™ products (RM Hub, A1 Environmental Sensor, SP2 Smart Plug, etc). When you see the RM node, just drag it onto your flow tab. It should look something like this:
Setting the Properties of the BroadLink™ RM Pro
The next step is to double-click the BroadLink™ hub node to open the PROPERTIES dialog box:
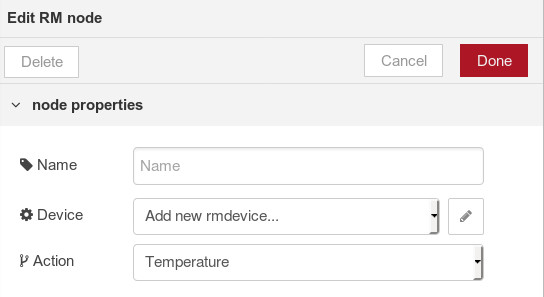 The PROPERTIES dialog is where you define which type of ACTION you wish to perform with the hub.
You will be able to simulate all the button presses you set up in the phone app (see home theater phone app article series).
We will be explaining how to transfer that information from your phone to the Pi and Node-RED shortly.
But first we have to identify this hub to the system (you can have more than one in your home), and you'll see a small PENCIL BUTTON (above) to the right of the DEVICE line ... click that to open the CONFIG NODE dialog; it should look like this:
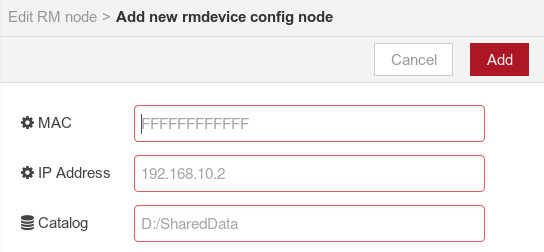 The CONFIG NODE dialog is where you set WHICH HUB you wish to control.
The faint default entries are put there to give you an idea of what type of data the system is expecting.
You will have to know the MAC address and IP address of the BroadLink hub on your local WiFi router before you can proceed any further.
We are also assuming you have assigned a static IP address to the hub, bypassing the DHCP system on the router, so that the IP address cannot change. If you don't do this, the IP address of the hub can change, rendering the control system useless.
Here is what the CONFIG NODE dialog looks like on our system (note that the ADD button has changed to UPDATE):
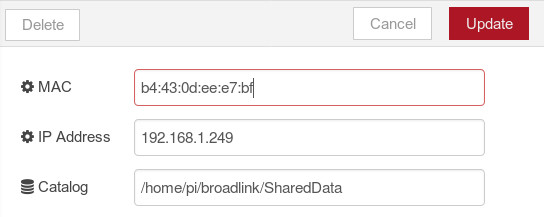 To repeat, the CONFIG NODE dialog is where you set WHICH HUB you wish to control.
The MAC ADDRESS is always the same (it goes with the hub), and the IP ADDRESS assignment should also stay the same, if you have locked it down with a static IP address assignment.
The CATALOG FILE LOCATION is where the button data from your phone app is replicated, and we'll cover that topic shortly. When you have completed these 3 entries, please press the ADD button to return to the PROPERTIES DIALOG.
See the image below for what you should expect, when everything is working properly. You won't see this until the button data has been copied from your phone, which we will cover shortly.
TIP: We found that we had to stop and restart Node-RED before it would pick up the hub CONFIG data, and it may even be a good idea to reboot the Pi if you are having trouble.
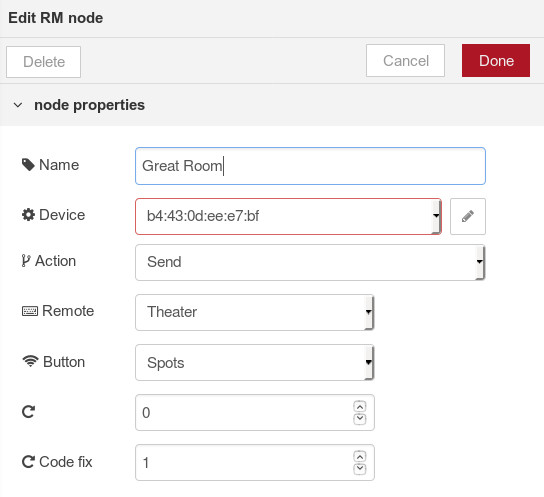 To repeat, the PROPERTIES dialog is where you define which type of ACTION you wish to perform with the hub. The following is a brief explanation of each parameter ...
NAME: This can be anything you like.
DEVICE: This is the MAC address picked up from what you entered in the CONFIG sub-menu.
ACTION: There are 4 possible ACTIONS:
- Set from Msg.Payload (allows another NODE to control this one)
- Learn (activates the learning mode of the hub to capture codes)
- Send (allows for the transmitting of a captured code)
- Temperature (monitors temperature sensor built into hub)
PLEASE NOTE: After choosing your ACTION in the drop-down selector, the remainder of the settings will adjust according to the selection. We are only interested in the SEND action at the moment; the other ACTIONS will be covered at a later time.
REMOTE: The selection in this drop-down list is picked up from the files that will be transferred from your phone. If you have different phone screens for different rooms or other functions, the names you gave them in the phone app will be shown here.
BUTTON: The selection in this drop-down list is also picked up from the files that will be transferred from your phone. All the buttons you had on your phone screen for the REMOTE selection above will be shown here.
For the purpose of simplicity, we have selected our spot lights in our home theater for this SEND example.
Copying the BroadLink™ Files From Your Phone
As mentioned previously, none of the above dialog items will function properly until you have copied some files from your phone to the Pi.
You may recall that, with the phone app, you can instantly clone your remote control screens to any other phone by using the SHARE function in the phone app MAIN MENU. This clever function is also used for transferring the files to the Pi.
Here are the steps to follow:
- Create the Transfer Data: Go to the main menu in your BroadLink™ phone app and set up the SHARE. This will write the required files to a folder called SharedData in the file area of your phone. You won't actually be performing a SHARE; this procedure just makes sure the SharedData folder has been created.
-
Locate the Data Folder: On our Android phone we used the File Manager to locate the target folder (SharedData). The path was
internal storage/broadlink/newremote/SharedData
Your phone may not have exactly the same folder structure, but it will be similar, and the SharedData folder will have the same name. -
Locate the Files: Inside the SharedData folder you will see quite a few sub-folders and files. None of the sub-folders are required, and only 3 of the files are required. They are:
- jsonDevice
- jsonButton
- jsonIrCode
- Transferring the Files: There are numerous ways to do this, but we found that the easiest method is by email. A long press on each file brings up the 'share' icon, with email attachment being one of the options, so we sent each file to ourselves at an email address.
-
Receiving the Files: At the receiving end on the Pi, we had already set up the very capable "Claws" email program so that it could receive the mail messages with file attachments. We also used the Pi File Manager to create the target folder. This can be anything you like, as long as the CATALOG entry above is the same. In our case it was
home/pi/broadlink/SharedData
We saved each of the 3 files into that folder, and then we were able to make everything above work. Just keep in mind we had to stop and start Node-RED to make it pick up the data, and it may even be a good idea to reboot the Pi.
Setting the Properties of the Alexa™ Node Component
This one is easy: drag an instance of the Alexa™ node onto the DESIGN tab and give it a unique name; that's it! We'll see how it is used in the next article in this series ...
----------------------------------------------------
Buy The BroadLink™ Hub and Accessory Modules In Our Online Store
In the meantime, we have the excellent BroadLink phone apps that are very capable, and they may very well be all you need (they work stand-alone, the RPi is not needed). This will give you direct control over our blind motors and window openers. Please note that you will need to set up the phone app if you want to implement the system described in this series.
If you are interested, you can purchase these products in our DIY online automation store.
Articles in this series:
Part 1: Alexa™ + RPi + BroadLink™ Hub + Node-RED: Blind Control Introduction
Part 2: Alexa™ + RPi + BroadLink™ Hub + Node-RED: Installing Node Components into Node-RED
Part 3: Raspberry Pi + Node-RED used as a home automation controller (you are here)
Part 4: Alexa™ + RPi + BroadLink Hub + Node-RED: A Simple Example: Light Control
Part 5: Alexa™ + RPi + BroadLink Hub + Node-RED: Control Blind & Shade Motors
Part 6: Alexa™ + RPi + BroadLink Hub + Node-RED: Configuring the Node-RED Dashboard Light Switch
Part 7: Alexa™ + RPi + BroadLink Hub + Node-RED: Configuring the Dashboard Blackout Blinds

 Shopping Cart Home - Start Here
 Remote Controls for Radio Equipped Motors
 DIY Starter Kits for Window Shades
 DIY Starter Kits for Window Openers
 ZWAVE Blind & Shade Controllers
 How To Choose the Right Blind & Shade Motor
 Select tubular Motor (Comparison table)
 Choose RollerTrol Battery & Solar Motors
 DIY Roller Blind Motors - FAQ
 How To Insert Blind Motors & Attach Brackets
 Calculate your Blind or Shade fabric Weight
 Select Tube Size for Blind Motor
 How to Insert Blind Motors Into Tube
 How to Insert Blind Motors Into Tube with Adapters
 Attach Mounting Brackets - Standard + Mini Series
 Attach Mounting Brackets - MAXI Blind Series
 How To Set Up Radio Equipped Blind & Shade Motors
 Series P Radio Remote Control Motors
 Series G Radio Remote Control Motors
 Series R Radio Remote Control Motors
 BroadLink RF/IR Hub System for Motors
 How To Set Up Window/Skylight Openers
 Introduction: Window & Skylight (K Series)
 BroadLink RF/IR Hub System for Motors
 Z-Wave Interfacing for Shade & Opener Motors
 Wired Wall Switch Control of Window Openers
 How To Use Alexa With Our Motors & Window Openers
 How To Use BroadLink Phone App Hub With Our Motors
 How To Set Up ShadeSlider Skylight or Bottom-Up Blind
 How To Retrofit RV, Boat and Motorhome Blinds
 How To Set Up Non-Radio Motors
 Operation & Travel Limits of Non-Radio Motors
 Make a Simple DC Motor Reversing Switch
 How To Set Up ZWAVE Control
 ZWAVE Controller for G Series Radio motors
 ZWAVE Door/Window Opening Detection
 ZWAVE Motion Detector with Temperature Sensing
 Motorized Window Blinds & Shades
 Motorized Dual Window Shade
 Make Motorized Blackout Blinds
 Phone-Tablet-PC Control for Motorized Blinds
 Mini Motor for Existing Shade Retrofit
 Roman Shade Retrofit
 Make a Motorized Window Opener
 Blind & Shade Motors for RV & Boats
 Make Your Own Projector Screen
 Curtain Closer: Ultimate Home Theater
 Wireless Battery Operated Drapery Motor Kit
 Make a Motorized Bottom-Up Shade
 Make a Motorized Skylight Opener
 BroadLink RF/IR Hub System for Motors
 Why Buy From US?
 Background & Mission Statement
 Customer DIY Testimonials
 Site Map - Search All Pages
 Why Buy From US?
 RollerTrol Users Forum
 Contact Page